Pages

Showing posts with label DIY. Show all posts

10/01/2013

Apple Picking

Hands down, picking pumpkins is one of my top Fall activities to do.  I just love it!  And, as you know, blueberry picking is right up there amongst my favorite Summer activities.  What can I say, I like to pick stuff!? (Okay, sorry, that sounded gross!)  Lucky for me, Antoine enjoys fruit/gourd picking almost as much as me...or maybe he just likes to see me get all kinds of nerdy, because I really do geek out about this stuff!  Regardless, when I suggested picking apples again this year he was like, "yeah, that would be fun!"  But here's the weird thing about me and apple picking, I really don't like apple baked goods.  GASP!!  I know, it's madness.  Now blueberry baked goods are my jam (haha, literally!) and there are few things I love more than carving pumpkins, but apples...meh.  I mean, I like to eat raw apples, though I tend to be a little particular (pink lady apples are the shit!), but when it comes to cooked apples I'm just not a fan.  I think it's the texture.

But the picking I dig!  I enjoy going to a farm, taking pictures, being amongst all the green and trees.  It's just a good feeling.  So, about two and a half weeks ago Antoine and headed about 45 minutes north to Lebanon to Irons' Fruit Farms, where we had picked a couple years ago.  It was a gorgeous day, sunny and not too warm. 
Irons' Fruit is a great little farm that also offers pumpkin picking and hayrides.  They have a variety of animals on the property and a cool little store with baked goods, jams and other fruits and veggies for sale.  Sadly, the property was a little more overgrown and worn than the last time we went.

But the creatures are all still pretty fun to watch, including this big pig!

 I naturally had to snap some pictures before we made our way out to the apple fields.


Sadly, the apples weren't too great.  The fields were overgrown, there was poison ivy everywhere, and most of the apples we would initially pick had to be chucked because they were rotten or bug infested.  So it took us quite a while to pick enough decent apples for fill a half bushel, but we still managed to have fun!

 Like I said, we picked a 1/2 bushel (which was $13)...in retrospect, that was way too many apples.  After making several crisps, jam and bread I still have apples coming out the wazoo!


After we picked out half bushel of apples we headed to the little Irons' Fruit store to pay for the apples and grab some baked goods, cider, green beans and peaches.
Antoine enjoying his apple hand pie!

On the way to our car we spotted this guy, who so nicely came up to the fence so we could pet him and I could take his picture!    So cute.

Despite the apples being kind of spotty and the crazy amounts of overgrown vines and poison ivy, Antoine and I still had a blast apple picking!

9/14/2013

Super Simple Mirror Update

Okay, so confession, this mirror update is so simple that it's probably not worth posting...but oh well, I'm going to anyway.  I love how easy it was and I wanted to share some helpful links and whatnot.  Plus, it's Saturday, so there!

Again, this wasn't my original intention with this mirror, but like with the desk I had to adjust my plan a little bit and I'm happy with how it turned out...
Way back in April I had hopes of disassembling the mirror (like I did), painting it some dreamy pastel color (maybe a light turquoise or a very light grey), and mounting it on the wall.  In the end, silver paint won out because the walls were pastel enough for me and when I got the thing apart I realized that the mirror was so heavy that hanging it on the wall, with our old crumbly walls, just wasn't going to happen.  Thus, the silver leaning floor mirror was born.

Here's what the mirror looked like before it got its little update, well, after I disassembled it.  It was a craigslist find that we picked up for like $15 a year or two ago.  The base was a little rickety, hence why I wanted to take it apart and spray paint it.

On the sides were little brackets where it had been screwed into place on the base.  Antoine easily popped these off for me with a pair of joint pliers, then I patched up the holes with some wall spackle we had lying around, and sanded it smooth once it was dry.

When it came to spray painting the mirror, I used Valspar spray paint and Design Sponge's "before and after basics: spray paint" for guidance.  I love their "before and after basics" series and highly recommend them to anyone!  With the guest bedroom the sanding 101 and the polyurethane 101 tutorials have been extremely helpful.  With this mirror I was actually able to unscrew the back and take the mirror out of the frame, so I didn't have to deal with taping it up. 

After probably five or six light coats of spray paint the mirror was done!  Super easy.  And I found a nice little spot for it inbetween the door and the night stand.  In the end I think I like it better there than where I was originally envisioning it on the wall.  Note my photographer's assistants, Cheese and Guillermo. They like to keep me company and make sure I'm doing a good job.  And you can kind of make out the nose smudges on the bottom of the mirror where Cheese was admiring my work checking out his handsome reflection!  Oh, those creatures...I love them!

9/13/2013

Sunburst Granny Square Afghan

One of the main reasons the guest bedroom took so long, besides for fact that Antoine and I kept saying we were going to paint the room "next weekend" and then didn't, was ultimately due to my gift for procrastination.  Seriously, it's a gift.  I'm so good at it that it's scary.

I started working on this sunburst granny square afghan about 4 months ago, then I ignored it for about a month and a half, and I finally finished it about 5 weeks ago.  Voila! Granny square awesomeness...
I think it's probably one of the best things I've crocheted in a long time.  I'm totally in love with it!   

I used this pattern (such great instructions!) and it was pretty easy.  I actually made all the round parts first and then created the squares at the end (and I used this method to connect the squares).  I'm really digging the colors I chose; I used the Simple Soft yarn except for the off-white portion (because the Simply Soft off-white was too yellowy).


Happy Friday everyone!  Any great weekend plans in the works?  We are hoping to go apple picking, since it's been years and years since we went and it was so much fun!

9/12/2013

Abstract Geometric Desk

About six or seven years ago I snagged up a desk that my parents were getting rid of because I didn't have a desk and I was a broke college student, so why not!  It was a desk that my parents had had for years, potentially handed down from another relative, that my dad had tried to refinish.  Here's the thing about my dad, he fancies himself a handy-man, but he's not so good with the details.  I love him to death, but his staining and polyurethane-ing skills leave something to be desired.

Anyway, so we had this desk that really wasn't our style and needed a facelift.  I had hopes to do an abstract geometric pattern on the top in various stain colors and then refinish the rest of the desk, changing the hardware, and painting the base in a neutral off-white.  That was the plan, but as you can see that's not what happened...
Instead we now have a wild, crazy-bright desk with a abstract geometric pattern and new hardware (and an unchanged base).  It's certainly vibrant and took a little getting used to, but in the end I think it offers a nice pop of color(s) to the space.  And I have to admit, I'm kind of impressed with my taping and painting skills on this one!

So, what led to the change in plan?  This...
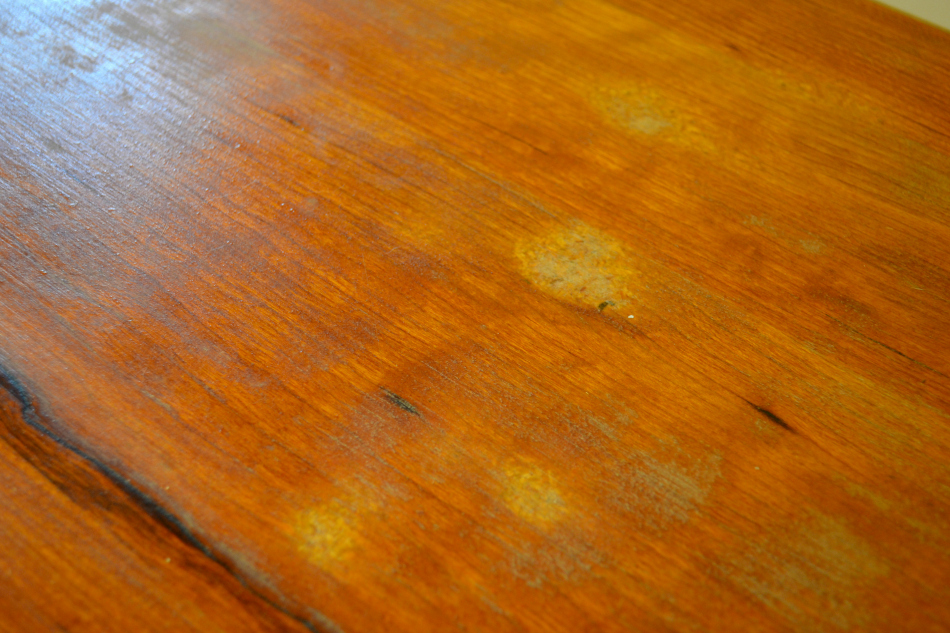
Once I actually took the pile of Rob Jones poster off the desk and looked at it more closely I realized that there was no way I was going to be able to stain this desk.  It had been sanded all the way through to the particle board in a couple spots and the whole top was so uneven that it was in need of some extensive sanding that would only make it more visually unappealing.  So painting the top became the only option.  I flipped my idea around and decided on a painted geometric top with a stained base.  But then Antoine brought me back to reality and told me I should probably just leave the base alone since I was already looking at a ton of work on the top.  He's so wise! 

We picked out a couple of Pantone Universe colors at Lowe's, they were having a buy one, buy one sale on sample paints so they were super cheap!

I sanded the top down and evened it out as best I could.  The sanding took a while, this photo was taken about half way through the sanding process.

Then I created an abstract geometric pattern using a yard stick and a pencil and went to masking off the triangles and painting.

Almost done with the first half of the table...I pulled a couple of late-nights (we're talking 1am and 2am), many of which were nights that I had to go to work the next morning.  Sometimes I'm not so smart!

As far as hardware went, it took me forever to decide what I liked best, mainly because the options were so horrible because of the irregular size of the hardware.  In the end, it was mostly the price of these handles that won me over...but I liked the look of them too!

I still need to put a couple layers of matte poly on top, but here's the nearly-finished desk.  In the end I'm so glad that I followed Antoine's advice and left the base part alone.  That would have been a nightmare to sand off the old poly and re-stain it!  It's a little bright and wild, and it messes with your eyes a little bit, but I like it!  It's definitely more exciting and fits out style better than it originally did!

9/10/2013

Our New and Improved Guest Bedroom

You may remember a million years ago (read: back in April) when I posted about plans to give our guest bedroom a little facelift.  I intended for it to be a quick and fairly inexpensive endeavor.  And while we managed to keep the costs down, it was not a quick process at all.  What can I say?  I excel at procrastination! Anyway, it's finally done and I'm pretty happy with how it turned out.

We didn't do everything we intended, but we freshened it up a bit so I'm happy.  I didn't take the best "before" photos, but I think this still gives you an idea of what it looked like...
Notice the gross-beige yellow walls!  When we bought our house four years ago (as of September 2nd...yay, happy house anniversary to us!) nearly all the walls were this color.  I loathe this color.  Repainting the guest bedroom marked the end of the beige-yellow color in our house, yay!  Also, let's talk about that hideous bedspread/bed-in-a-bag for one second.  I bought that thing when I was in high school through a catalog.  I loved it at the time, but over the years it has just become more and more hideous to me!  But it's gone now, so I'm happy.

As you can tell, the guest room used to be a place for our spare crap and Antoine's poster collection...where occasionally a guest would stay, amongst the junk.  The door was always shut, so the cat wouldn't chew on said junk (Gui likes to chew on cardboard and wires laying around on the ground).  Because the door was always closed, the room sort of felt disconnected from the rest of the house and was regarded as an afterthought.  Part of my motivation for giving it a facelift was to open it up and have it become a true part of our house, instead of a storage room.  And, happily, it has...
The "after" shot.  A little brighter and hopefully a little more welcoming.
The walls got a fresh coat or two of paint (silver peony from Sherwin-Williams).  The bookshelf didn't change one bit.  I had originally hoped to relocate it to another wall in the room, but in the end it ended up looking best where it had been all along.  The rug, which originally I wasn't sure about, is really growing on me...and it's actually a really nice rug for $20, you can't beat that!  I'm in love with this little record stand (above right) I got from Urban Outfitters!  I wasn't originally going to get one right away, but it went on sale and there was free shipping so I jumped on it.  As you can tell from the "before" photos (top right and bottom left) my record player was originally just chilling out on the floor.

The desk was one of the bigger updates in the bedroom, but I've got a whole separate post about that coming up...so stay tuned.  The chair is another inexpensive find from Ikea.  Above the desk I hung a couple of my magnolia photos in a pair of Ribba frames.  I also matted, framed and hung two of Antoine's Rob Jones posters, one Raconteurs (seen here) and one White Stripes (which you can see in the first photo).  Antoine has a pretty great Rob Jones collection and it always satisfying for both of us when we can display more of them, since we love them so much!  Now we have Rob Jones items in our living room, dining room, upstairs hallway and guest bedroom.  If only we had more wall space!

Some details.  
The curtains: we ended up finding these at Home Goods/TJ Maxx for like $10 a pair.  Originally I didn't want to go with sheers, but in the end I like the amount of light they let in and the pattern still offers some privacy when they are pulled shut.  
The cranes:  they weren't part of my original plan, the idea just popped into my head at the last moment.  Several years ago I decided it would be fun to fold a thousand cranes out of any/all scrap paper I could find, so I did.  And for years they sat in boxes in closet (minus a couple at work and some hanging from friends and families rear-view mirrors).  That corner of the room was looking a bit empty so I found this handy tutorial (super glue...genius!) and made a little make-shift mobile near the window.
The print:  you might remember this print from my Crafty Supermarket post from April.  I adored it when I spotted it in Kelly's Etsy store, Burrowing Home, but once I got to Crafty and saw it in person I just had to have it!  I matted it myself and put it in this frame, also from Ikea (surprise, surprise!) and on sale.

A couple other touches...I re-purposed a standing mirror we had (more on that later), swapped out our old brown lampshade for a fresh white one, traded the hideous Indian-inspired bedspread for a pale green down comforter we already had and bought a basic white bedskirt from Target, purchased a couple of throw pillows for the bed (here and here), and crocheted an afghan for the bed (but again, more on that later).

There's still a couple more finishing touches (i.e. something for over the bed, it feels a bit bare, and polyurethane the top of the desk), but overall it feels pretty finished.  And that's a great feeling, I gotta say!

4/23/2013

Ideas and Inspiration for Our Guest Bedroom

When we first moved into our house almost every single room was beige.  And beige just happens to me the worst color in the world, in my opinion.  I hate it.  So we started, slowly but surely, painting the various rooms in our house.  We immediately started with our living room (grey) and our kitchen (a mossy green).  Then in 2010 we updated our bedroom (one of the few rooms that wasn't painted beige) and in 2011 we livened up our dining room.  The only rooms left untouched in the house now are the bathroom and the guest bedroom.  The bathroom, which is the only other non-beige room in the house now, needs a little more than a coat of paint.  It's the only room in the house that wasn't remodeled before we bought it, so it is going to take more time and money to update than we have at the moment.  Since the bathroom is on the back burner at the moment we decided to tackle the guest bedroom this summer.

The guest bedroom is the room in the house where we just kind of throw stuff and store it...when we don't have guests.  The door is kept closed most of the time, so we kind of forget about it.  Most of the furniture is from my college/post-college days, but it's fairly decent stuff that just needs a little face-lift.  Here's some of the ideas I've been throwing around in my head regarding the guest bedroom:


     1.) Currently I have a slightly awful Indian inspired(?) comforter on the guest bed.  I loved it when I was seventeen, but now it's just an eyesore.  I'd like to swap that our for a nice down comforter and an oversized granny square afghan.  I found this excellent sunburst granny square tutorial from Nittybits.
     2.) Using this tutorial I've started working on an afghan.  I'm going for lighter shades in the center with a cream colored square surrounding them.
     3.) We recently purchased the color for the room during Sherwin William's big anniversary sale.  It's called Silver Peony.
     4.) We're planning on framing some of my photos and I'm leaning towards these Ribba frames from Ikea.  I love when a frame comes with a mat (of course I'll use our mat-cutter at work to customize it perfectly)!
     5.) Antoine has a pretty impressive collection of Rob Jones posters, most of them White Stripes or Raconteurs, and they're scattered throughout our house.  Yet there's still a bunch that we haven't hung, so we're planning to use the extra wall space in the guest bedroom to hang up the remainder and I like the idea of clustering them together like this.  This post offers some great tips and tricks to hanging multiple frames.
     6.) We've got an existing desk and hope chest in the room that are in desperate need of refinishing.  I love these stairs and the idea of using different shades of stain to create a pattern, though I can't afford to pay a professional to do it and I don't have the skills to do it myself, at least not on that level.
     7.)  Something like this is a little more my speed.  I saw this "before & after" project on Design Sponge and though, hey, I could do that on my desk!  
     8.) & 9.) So, my idea is to do an abstract geometric design on the top of our desk using various shades of stains (brown tones - #9 is a quick mock-up I made using Paint) and then stain the rest of the desk in a coordinating shade.  We'll see how it goes!
     10.) I've also become mildly obsessed with the idea of making a lamp shade out of 35mm slides.  I found this pretty handy tutorial.  I just love how the light shines through the slides and illuminates them.
     11.)  Here's a better idea of what the color will look like on the walls (though this is not our guest bedroom), using Sherwin William's color visualizer.

It's my hope that once it's updated it won't be the room we just close the door to and forget about.  I'd like to keep the door open and use the room (mainly the desk) a bit more.  We shall see!

3/11/2013

Terrariums

I was lucky enough to spend this past weekend in Hocking Hills with three of the best ladies on the planet, my best friend (Amanda), my sis (Michelle) and my sister's best friend (Helene).  We rented a cabin, cooked some tasty food, drank wine, played games and, best of all, celebrated Amanda's birthday, which was this past Thursday.  More on our fun trip to Hocking Hills later, for right now I want to talk about Amanda's birthday gift.

As usual, I had no idea what to get for my HLP's birthday.  I tried to sweet talk her into creating an Amazon wishlist, but of course she didn't listen to me.  Something about how I have a $2K camera on my wishlist, which was wildly impractical because no one would ever get that for me (including myself), so there.  That pretty much summed up her argument.  So, without a wishlist to go off of Antoine and I decided to hit up the antique malls in order to find something fun and interesting for my one-of-a-kind best friend.  While hobbling around Ohio Valley Antique Mall (the best in the Cincinnati area, in my opinion) I spotted a booth selling terrariums.  They were cute and something I thought Amanda would like, though they were either a bit too small or too big and awkward.  But Antoine immeditately said, "hey, we can make her one of those ourselves!" (as he does with most things).  And yeah, he had a point...this time.  After a quick google search on our phones we discovered that it was definitely do-able and even had a list of what supplies we'd need. (Try these three sites for instructions, however, please note that if you are using succulents, like we did, you can not do a closed terrarium.)  

So we switched gears and started looking for glass containers for said terrariums...because, I mean, we might as well make one or two for ourselves while we're making Amanda's, right?!  We found a collection of vintage class jars that were pretty reasonable (though it was kind of eye-opening to see the broad range in pricing throughout the antique mall), as well as a couple miniature animals for the terrariums. Then we went to Petsmart for carbonized charcoal and moss and Lowe's for rocks and plants.  We already had potting soil at home.  Since the jars didn't have large openings at the top we used a small spoon and chopsticks to maneuver the plants and things around, which worked pretty well once you got the hang of it.  Here's the finished product, Amanda's birthday terrarium...

We used the biggest jar for hers, which allowed us to fit in three succulents, a couple rocks and a tiny snail figurine.

Aerial/interior view of Amanda's terrarium.
I love the little glass snail we found for her terrarium.  We originally wanted a little dinosaur, but couldn't find any small enough so we settled for this guy.  He's pretty cute; I'm happy we found him!

Three of the four terrariums we made.  We made the big one for Amanda, one for our house (not pictured), one for a certain someone as a thank you gift, and then one for Antoine to put on his desk at work.

The terrarium we made for our house.  You can't really tell in this photo, but this jar is actually blue glass.  Note the adorable tiny frog figurine.

He's so cute!


I'm pretty pleased with how they turned out!  Stay tuned this week for some cabin/girls weekend/Hocking Hills related goodness!