Pages

Showing posts with label recipe. Show all posts

9/20/2013

Recipe Love

If you haven't already noticed, I've been on a cooking/baking/jamming kick lately!  I think there's just something about the arrival of Autumn that just makes me want to be in the kitchen.  Since I've been pinning recipes like crazy as of late, I thought I'd share some of my favorites that I've made and some that I desperately want to try out!

Things I've made lately and loved:


This blueberry peach crumble and an apple crisp, both with some very minor modifications.


As far as jammin' goes, so far this year I've mades these: strawberry vanilla jam, honey lemon [spiced] apple jam, nectarine raspberry freezer jam, strawberry freezer jam, orange ginger marmalade (pictured), and pineapple jam.


I made a three layered carrot cake with maple cream cheese frosting using this recipe from Smitten Kitchen.


    We've also been on a bit of a soup kick lately.  It started with the best creamy tomato basil soup I've ever made, which I found on Shared Appetite.  As soon as Antoine and I finished off this soup we were already craving another batch (and I intend to make some more very soon!)

    To go along with the tomato soup I made some classic white bread using a recipe from the back of a Gold Medal flour bag.  It became grilled cheese sandwiches, of course!
    I also recently made a batch of potato leek soup that I found on the Food Network (though I added a couple garlic cloves to it!)


    Recipes I desperately want to try out:

    Happy Friday everyone!  I hope you all have a wonderful weekend!  Mine will be busy.  I'm on a committee that has been planning our staff family picnic for work, and it's tomorrow...so I'll be running around like a crazy person.  Hopefully I'll get some down-time on Sunday!

    7/19/2013

    A Trifle Excited

    Antoine and I are heading to Amish Country (aka Holmes county Ohio) for the weekend to celebrate his birthday, and I'm just a tad excited about it.  I grew up about an hour from "Amish Country", so we went there often while I was growing up.  But this will be Antoine's first time going (and yes, I did make a Pinterest board just for this little weekend excursion, because I'm crazy)!  Amish Country in general is a bit of a novelty, especially when you grew up on a farm surrounded by humble Amish farmers and played with Amish kids in the summertime like I did.  For me Amish Country is all about memories.  Eating at certain restaurants, going to certain stores...it makes me think of my childhood.  Plus, the food is rad!  No, seriously, I've been daydreaming about peanut butter cream pie from Amish Door nonstop, all week!  I can't get it out of my head.  My diet is so going down the drain tomorrow because I am going to shove so much peanut butter pie in my face.  Mmm, pie!  It will be glorious!

    Speaking of sweet things...I made a trifle (my very first) this week to take over to my sis' house and I knew I had to share it.  Antoine, Cheese and I headed over to my sis and bro-in-law's house for a cookout/furry creature playdate, so I thought I'd make a trifle and use up the rest of the blueberry filling I had leftover, stored safely in the freezer, from the cake I made two weeks ago
    Not the prettiest thing in the world, but damn did it taste good!  I used angel food cake, to make it a bit lighter, and whipped up this awesome microwave lemon curd (so easy and SO good, especially if you throw some lime juice into the mix) and this tasty coconut whipped cream.  I started with cubes of angel food cake, then a layer of curd with strawberries on top, followed by coconut whipped cream, then more cake, blueberry filling, coconut whipped cream and repeated the bottom layer one more time. 

    I topped it with more whipped cream, blueberries and the last of the lemon curd (minus a spoonful that went straight into my mouth).

    I thought it was really tasty, light yet very flavorful.  The coconut whipped cream and fresh fruit made it very refreshing.  It would make a great picnic item, though the coconut whipped cream might get a little melty on you if it's not kept cold...but it'll still taste great!

    So how about you, any fun weekend plans in the works?  Whatever you do, stay cool...it's been hot enough outside to melt your face off!  Okay, not really.  But kind of!  Anyway, happy Friday/almost the weekend!

    Okay, now I'm going to go think about peanut butter pie...

    7/10/2013

    Blueberry Lemon Cake

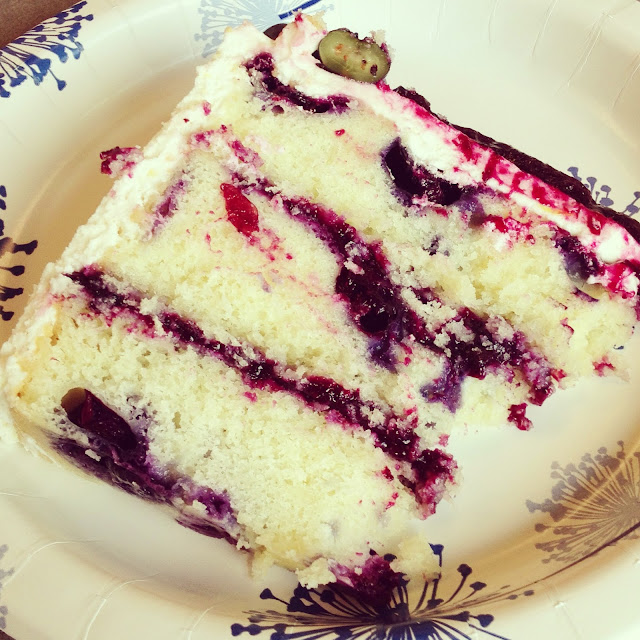
    I've been on a blueberry baking roll lately.  This always happens after blueberry picking, when I have a ton of fresh, plump blueberries, my mind starts racing on what to make with them.  Lucky for me, one of my coworker's birthday falls smack dab in the middle of blueberry season.  In the past I've whipped up cheesecake for the occasion, but this year I decided to go all out and make a blueberry lemon birthday cake...entirely from scratch!  Right down to the blueberry filling and the zesty lemon buttercream.  And it turned out pretty well, especially for it being only the second cake I've ever made from scratch (here's the first if you don't remember).

     Ta-da!

    For this cake, filling and buttercream I used two different recipes and tweaked a couple of the ingredients slightly to get the results I wanted.
    For the cake and filling I used Mother Thyme's recipe (pictured on the left) and for the zesty lemon buttercream I used Kitty Cat Stevens' recipe (pictured on the right).  Both are great recipes and I'd highly recommend either!


    For the cake:  I didn't change any of the ingredients in Mother Thyme's cake recipe, except I added about 1 1/2 cups of fresh blueberries (tossed in a little flour) to the batter.  I used three 8" cake pans, greased with butter and coated in flour, and baked them at 325 degrees (compared to 350 degrees in her recipe) for a little bit longer time so that they wouldn't rise too much.  I learned that tip from this wonderful post on how to build a layer cake from Completely Delicious!

    For the filling:  I tweaked Mother Thyme's recipe quite a bit, so here's my modified list of ingredients...
    • 3 cups of fresh blueberries
    • 3/4 cup water
    • 1 cup sugar
    • 3 TBSP cornstarch
    • juice of one lemon (about two tablespoons depending on your lemon)
    • zest of two lemons

    For the buttercream:  I ended up adding an extra tablespoon of lemon juice (3 tablespoons total) because my buttercream was still a bit too stiff.  The zestiness of all that lemon zest and juice really cut the sweetness of the powdered sugar, so the buttercream wasn't sickeningly sweet like some can be!

    I did the traditional crumb coat followed by a second layer of buttercream, and had enough buttercream left over for Antoine to devour.  And since I had so much excess blueberry filling left and, obviously even more blueberries in my fridge, I tried to pretty up the top a bit...mainly because I still need a good piping bag.

    Voila!  Everyone really seemed to enjoy the cake...it was completely gone (save one piece set aside for Antoine) by the end of the day.  Most of the blueberries still sunk to the bottom of the cake pans (even with the coating of flour) because they were so heavy, but that's okay.  As far as cake goes, it was pretty tasty.  Sweet, but not sickeningly so, and zesty!

    6/28/2013

    [Guilt-free] Ginger Mint Slush

    Last year when I saw The Soho's recipe for a mint ginger slush I immediately thought, "Ooo, I need to try that!"  And I had every intention to, but then, as you all know, there was a drought and my mint refused to grow.  But this year is a different story and my mint (both kinds) are thriving!  So I decided to adapt Natalie's recipe a bit to make my ginger mint slush a little zingier and guilt-free.


    Ingredients:
    • 12oz of Canada Dry Ten (or any diet ginger ale)
    • juice of 1/2 a lime
    • 10 to 14 mint leaves (I used sweet mint and my leaves were pretty small, so I used about 14)
    • a small piece of ginger (the size of about 4 nickels stacked together)
    • 2 to 3 cups of ice (depending on the consistency you want)
    Combine all ingredients in blender and blend until smooth. Serves 1 to 2 people.

    In the end you're left with a really refreshing, cool treat that's perfect for a warm day.  I was experimenting and had all these ingredients on hand, but you could really tweak it to your liking.  I originally thought of adding the ginger because diet/low cal ginger ale tends to have less of a ginger taste to it (though I'm crazy about the Ten right now).  I was a little worried that the fresh ginger would be too overpowering, but it wasn't at all.  The flavor was definitely there, but it didn't smack you in the face or anything.  It would also be really tasty (if a little less guilt-free) with any of the Joia sodas or the Fresh Ginger ginger ales (though you wouldn't need the additional fresh ginger with these), but I've been having trouble finding both brands in Cincinnati lately.  Hopefully they turn up soon!

    Unrelated to the ginger mint slush, I just found out some sad Cincinnati news...Mayberry, our favorite brunch spot in the city, will be closing after their brunch service on July 7th.  Such sad news!  It's such a great establishment with wonderfully delicious food and I will definitely miss it!  Antoine and I are hoping to go for brunch two more times before they close and I urge you to try it out if you've never been!  In case you missed it or have forgotten, I've blogged about Mayberry several times in the past: here, here and here.

    Hope you all have a wonderful weekend!

    3/20/2013

    Buffalo Turkey Burgers

    Coming off the winter season carb-binge, Antoine and I are trying to make an effort to watch what we eat and make more of our meals at home.  Eating out and getting things to go is just so easy, but now that we get to spend our evenings together (because he's not consulting), we need to get back into the swing of things.  I enjoy cooking (though I enjoy baking more) and lucky for me Pinterest makes finding and organizing recipes so easy.  So, when I stumbled upon Can You Stay For Dinner? via Pinterest I was immediately intrigued by Andie's story and interested in trying out her recipes.  I've been craving a burger lately so I ultimately opted to try out her recipe for Buffalo Turkey burgers first.

    In general, I am not a fan of spicy foods!  In fact, I'm an utter wimp when it comes to spicy things.  But, strangely enough, over the last year or so I've developed a deep infatuation for "Buffalo" items...namely, Dewey's Ryan Inferno pizza.  It, my friends, is pure heaven in a pizza box!  Seriously, my mouth immediately starts watering the second I think about it!! Mmmm.  Anyway, back to buffalo turkey burgers.  I altered Andie's recipe just a tad and I was pretty pleased with the results.


    The only thing I had resembling poultry seasoning was herb chicken seasoning, so I used about 1/2 tsp of that and 1/2 tsp of Spike.  Instead of Frank's original red hot sauce, I picked up some of Frank's Buffalo sauce.  And, being the wimp I am, I used about 1/8 cup of sauce instead of 1/4 cup, as the recipe called for.  Though, I probably could have handled 1/4 cup, and those of you who like hot sauce should probably add more.

    Instead of making a bleu cheese spread as the recipe suggested, I opted to add gorgonzola directly to the turkey mix.  I personally like the way bleu cheese/gorgonzola caramelized and burns up a little when it hits the frying pan.

    Once the gorgonzola was mixed in, I formed the turkey mixture into four relatively even sized patties.  This was kind of a messy job since the mixture was very moist and sticky.  I ended up placing the patties on a baking sheet lined with a silicone mat and stuck them in the freezer until Antoine got home from work.  This really helped firm them up and made pan-grilling them so much easier.  I think this step would be essential if you were thinking about grilling them, otherwise I think they'd just fall apart on you before they had time to cook up.

    The finished product, complete with low-cal slim bun and some spinach.  Oh, and yummy roasted garlic red potatoes on the side!  I know they aren't technically "healthy", but I had the calories for them that day so I went for it!  Plus, I've been craving roasted potatoes like nobody's business.

    For roasting, I like to cover my potatoes in a little olive oil, salt, pepper and a couple cloves of garlic.  Then I toss in some springs of rosemary (which I remove later), if I have it on hand, because the aroma is fantastic.  I bake them at 450 degrees for about 35 to 45 minutes, giving them a stir at the half way point.  In the last 5 or 10 minutes I like to drizzle a little balsamic on them, it helps caramelize them a bit and, really, you can't go wrong with balsamic!

    I left the cooking of the turkey burgers up to Antoine, because he's the expert when it comes to cooking meats properly!  The finished result was pretty flippin' tasty.  The burger had great flavor, with little pockets of gorgonzola, and was really moist. Lucky for us, we've got the other two burgers hanging out in the freezer for another dinner, later in the week.

    Buffalo Turkey Burgers (adapted from Can You Stay For Dinner?'s recipe)
    recipe makes 4 decent-sized burgers


    1 tsp olive oil
    1lb ground turkey (93% lean, white meat)
    1/8 to 1/4 cup Frank's red hot wings buffalo sauce (or more if you like things spicy)
    1/4 cup finely chopped red bell pepper
    1/4 cup sweet onion
    1/2 tsp Spike seasoning
    1/2 tsp poultry seasoning of your choosing
    1/4 cup Gorgonzola or bleu cheese 
    salt & pepper to taste

    In a small saucepan over medium heat, add olive oil.  Then add diced peppers and onions and saute for about 2 minutes until the onions become translucent and the red pepper lose some of their bright red color.  Transfer onions and peppers to a small bowl and set aside.  

    In  medium mixing bowl, add turkey, hot sauce, cooled onions and peppers, seasonings and salt & pepper to taste.  Mix with your hands (or a spoon, if you're a sissy!) until everything is well incorporated.  Then add cheese and gently incorporate it into the the turkey mixture.

    Line a baking sheet with a silicone mat or parchment paper.  Form turkey mixture into 4 even patties, placing them on the lined baking sheet. (I like to make my burgers and turkey burgers slightly concave, so that when they cook they don't turn into a burger ball!)  Place the baking sheet in the freezer for at least 30 minutes, this will firm up the turkey for easier cooking.

    Grill or pan fry (over medium high heat) the turkey burgers until center starts to firm up or the internal temperature reaches 165 degrees F.  


    *All photos taken with my iPhone 4
    **This recipe was not sponsored Pinterest, I'm just a Pinterest fiend.